How to Identify Wood Type: A Step-by-Step Guide
Standing in front of a board rack or pulling furniture apart for a restoration project, “what kind of wood is this?” can feel like a simple question. Often it isn’t. Lumber yards shelve dozens of species with overlapping color and grain. Reclaimed wood loses its label somewhere between the barn wall and the sawmill. Antique furniture can carry several different wood types across one piece, each one finished to look the same.
Identifying wood type gets faster once you have a classification system rather than a gut feeling. Work from broad to narrow: determine the major class first, then the structural subtype, then the species. Each step rules out a large chunk of candidates and leaves a short list to confirm.
To identify wood type, use a 3-step system: check end grain for pores (pores present = hardwood, no pores = softwood). Within hardwoods, determine if pores cluster in rings (ring-porous: oak, ash, hickory) or scatter evenly throughout (diffuse-porous: maple, cherry, walnut). Then match color, ray pattern, and weight to pin the species.
Step 1: Determine Wood Type (Softwood or Hardwood)
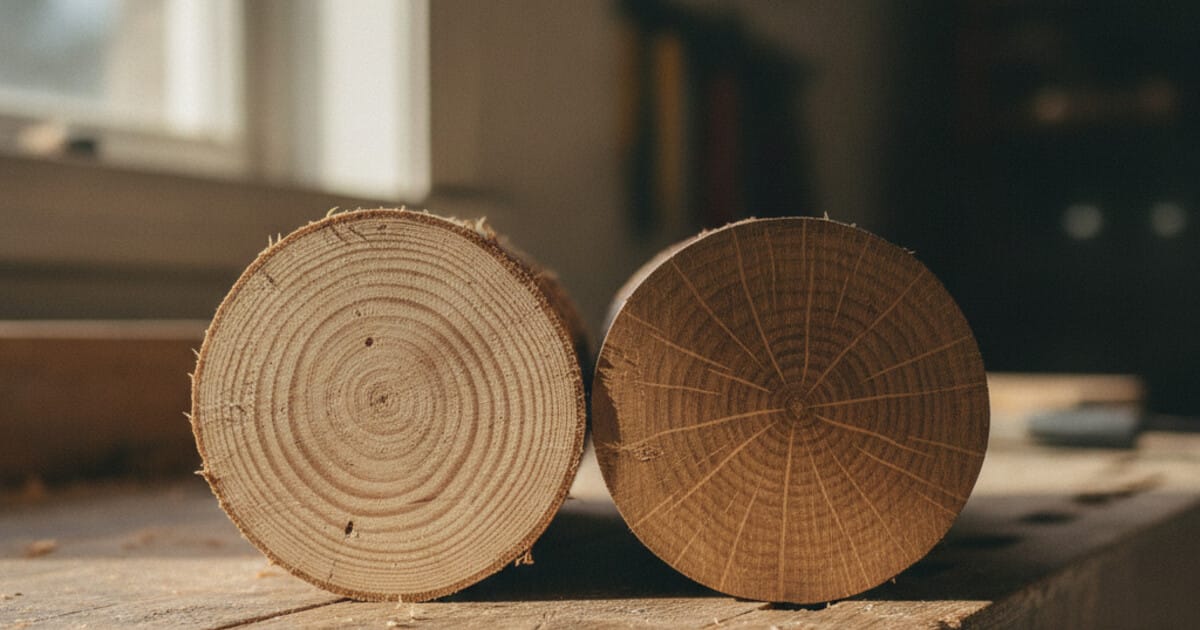
The first classification step happens at the end grain. Find a cross-section or cut end and examine it in natural light, ideally with a smartphone zoomed close or a 10x loupe. Pores (tiny holes scattered across the surface) identify the wood as a hardwood. No pores, just alternating light and dark bands, means softwood.
North American and European commercial lumber divides into two biological classes with distinct structural properties. Softwoods come from gymnosperms (mostly conifers: pine, fir, spruce, cedar, redwood, Douglas fir) and make up roughly 80% of all lumber sold globally by board-foot volume. Hardwoods come from angiosperms (flowering trees: oak, maple, cherry, walnut, ash, poplar). The naming is counterintuitive: balsa is technically a hardwood despite being lighter than cork, while southern yellow pine is technically a softwood but harder than many hardwoods by Janka scale. Practically, hardwoods range from 350 lbf (soft poplar) to over 3,000 lbf (hickory and osage orange) on the Janka scale; most softwoods fall between 400 and 1,200 lbf. At the cellular level, hardwoods contain specialized pore vessels for water transport; softwoods use tracheids instead. End grain reveals this distinction without any equipment.
On common softwoods: pine, fir, and spruce show clear light-to-dark banding with no pores. Resin canals appear as tiny dark dots in some conifer species, but they don’t resemble pores. Cedar shows fine, tight rings with a characteristic reddish heartwood.
For a full breakdown of property differences between the two classes, see the hardwood vs softwood guide.
Step 2: Read the Pore Pattern to Identify Hardwood Type
Once you’ve confirmed a hardwood, end grain tells you the structural subtype and narrows the field considerably.
Ring-porous hardwoods show a clear band of large pores at the start of each growth ring (the spring or earlywood zone), followed by smaller pores through the rest of the ring. Oak, ash, hickory, elm, and chestnut fall into this group. The large pore rings are visible without magnification on most species. Oak’s rays (lines radiating outward from the center) are also a standout feature: wide, prominent, and clearly visible on end grain without any lens.
Diffuse-porous hardwoods scatter pores evenly throughout each growth ring rather than clustering them at the ring boundary. Maple, cherry, walnut, birch, and poplar are all diffuse-porous. Annual rings are still visible, but the pore distribution looks uniform rather than banded. Face grain on diffuse-porous woods tends to look smoother and more even than ring-porous species.
A third category, semi-ring-porous, sits between the two. Walnut and black cherry both lean toward diffuse-porous but show slightly larger pores near the ring boundary in certain boards. This causes confusion when separating walnut from ash in dim light; end grain pore banding is the separator.
For a more detailed look at how pore structure shows up in face grain across species families, see wood grain types and patterns.
Step 3: Narrow Down Wood Type by Color, Weight, and Rays
Pore structure tells you the family. Color, weight, and ray pattern close the identification to a specific species.
Color in natural daylight gives the most honest read on a fresh, unfinished surface. Incandescent and LED light push yellows and distort readings, so take color reads near a window when possible. Some reliable baselines:
- Walnut: chocolate-brown heartwood, often streaky at the pale sapwood boundary
- Cherry: salmon-pink when freshly cut, deepening to warm reddish-brown over months
- Hard maple: nearly white to pale cream, very consistent across boards
- White ash: pale tan to light brown, similar to oak but without oak’s yellow-green cast
- White oak: yellow-brown to light tan, with a faint greenish cast in some boards
- Pine: pale yellow with prominent knots and visible resin canals at end grain
- Birch: pale cream to light tan, easily confused with maple at a glance
Color shifts with age and finish, so treat it as a supporting cue rather than a final answer. A fresh cross-cut at the board end shows the true baseline color better than the weathered face.
Weight separates species quickly when appearance is ambiguous. Pick up comparable-sized boards and feel the difference. Hickory, hard maple, and white oak are noticeably heavy. Poplar and basswood are light enough to feel like softwood. Walnut sits in the middle, denser than it looks for its color. If a pale, fine-grained board feels surprisingly heavy, hard maple is a strong candidate over birch or beech.
Ray patterns are particularly useful for separating similar-looking species. Oak rays are wide and very visible on quartersawn faces as streaks running parallel to the board length. On end grain under a loupe, oak rays read as prominent tan or white lines radiating from the center. Maple rays are fine and dense. Birch rays are narrow and numerous but finer than maple. Beech rays are wide and closely spaced, giving end grain a speckled appearance. Quarter-sawn oak produces a dramatic ray fleck pattern on face grain that’s nearly impossible to mistake once you’ve seen it.
For applying these same cues to furniture construction specifically, see how to identify wood in furniture.
Identifying Wood Type from a Photo
A smartphone captures enough detail to identify wood type in most cases, as long as you photograph the right surfaces.
Shoot end grain in natural light first. That’s the primary identification surface for all three steps above. A second photo of face grain on an unfinished or raw surface adds color and figure data. If you can only access finished wood, focus on end grain (stain penetrates unevenly at cut ends and pore structure stays readable) and factor in weight.
The Tree Identifier app includes a wood type recognition feature built around grain pattern, texture, and surface appearance. Point the camera at a raw or finished wood surface, take a photo, and the app matches it against species profiles covering color, pore structure, and grain figure. You can test the wood identifier tool in your browser before downloading. The same app identifies living trees from leaf, bark, flower, and fruit photos, so it handles both wood and standing-tree identification from one download.
Two shots generally work better than one. An end-grain close-up plus a face-grain shot in natural light gives the AI enough information to separate species that look nearly identical in a single image.
For a complete visual guide to what to shoot and how to read each diagnostic feature, see how to identify wood.
Frequently Asked Questions
What’s the difference between hardwood and softwood by appearance?
Check end grain under magnification. Hardwoods have visible pores (tiny holes across the surface); softwoods have none, showing only alternating light and dark annual ring bands. This one test separates the two classes faster than any other method. A loupe or smartphone macro lens gives enough resolution for most identifications.
How do I tell oak from ash? They look almost identical.
Both are ring-porous with large open pores, but oak has very wide, prominent rays visible on end grain and face grain. Ash rays are narrow and much less distinct. Color also separates them: ash is paler and more uniform; white oak often shows a slight yellow-green cast. On end grain under a loupe, the ray width difference is usually enough to confirm one or the other.
Can I identify a finished wood type?
Yes. Focus on end grain (finish penetrates unevenly there, leaving pore structure readable) and on weight. Surface finish doesn’t change how a board feels or how much it weighs. If you can access an unfinished edge or the underside of a piece, those surfaces show species color and grain without distortion from the topcoat.
How do I separate maple from birch? They’re both pale and fine-grained.
Weight is the fastest separator. Hard maple is considerably denser than birch. End grain helps too: maple rays are finer and more numerous, giving a denser-looking pattern. Birch has a slightly duller surface sheen on face grain compared to maple’s near-glassy smoothness when sanded. Color reads are similar, so rely on weight and end grain rather than face appearance alone.
Wood type identification sharpens quickly with practice. End grain in natural light is the primary method; color, weight, and rays confirm the answer. The Tree Identifier app is free to download on iOS and Android, with 2 identifications per day at no cost, covering wood type recognition alongside living-tree identification in the same tool.
Identify a tree from your photo — free
Upload a leaf, bark, or whole-tree photo and get the species in seconds. No signup.
Confidence:
Unlock the full species profile
Free in the app — with unlimited identifications.


AI result for guidance — the app gives full species details and works offline.
Want unlimited identifications?
Get the full species profile, photos and details — free in the app, with unlimited scans.
- Unlimited identifications
- Full species profiles & details
- Works offline, anywhere
- Save and revisit your finds
Elena Torres
Tree Identifier Team